

Lucy, Charlie Brown, and Linus sit for a portrait outside my front door. This “welcome mat” was shot using my iPhone.
This post is written in response to the requests I’ve received for tips on photographing dogs. Photography, in general, is subject about which A LOT has been written, so I’m going to hit on quick and simple ideas that I’ve found useful with my dogs. I’ll “focus” on these areas: dog wrangling, light, composition, equipment, and editing for taking dog portraits.
1. Dog wrangling.

Linus is staring at the treat in my hand. Ths “stay” command allows a few seconds to focus and press the shutter a few times so I can choose the image I want. Yes, Linus enjoyed the treat!
Use basic commands of “sit,” “stay” and “come” when taking dog photos. Photo sessions double as training sessions! I have noticed an improvement in my dogs’ response to “stay” since I’ve been taking more frequent squad photos. When Linus sees the camera, he will sit before I even give the command. Reward and praise – and be patient.
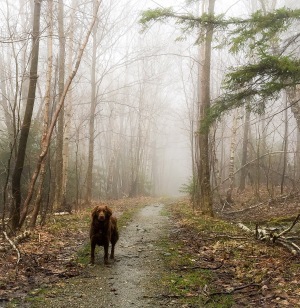
Charlie on a foggy morning walk. I liked the mystery created by the fog but had to lighten up the image with editing to see Charlie a bit better.
2. Light. Take note of the light source and light direction before you start shooting. Light is important for evoking emotion and capturing details. The topic of light in photography is too broad to discuss in depth here. However, here are a few thoughts:
- Consider what you’re trying to shoot then find the right light. I prefer natural light, whether outside or inside next to a window. Early morning and late afternoon provide better light than full sun midday when shadows will be strong and could make your image striped or dappled. If the sun is bright, move into the shade for even light and no squinting. Shade on a light-colored sidewalk or on sand will yield more true colors than shade cast by bushes on the grass, which will give a greenish cast.
- Bright light will better define the action at high shutter speeds for action shots.
- Fog and mist create drama.
- Generally, you will need more light to photograph a dark colored dog like my Charlie Brown than you will need for a light colored dog like Lucy or Linus.

Linus, giving me the eye. Black & white shows texture well. Also, note the circular (triangular?) composition of the dog’s body around the shadow.
Optional exercise: Try converting your images to black and white and discover the lessons in contrast and texture to be learned from black and white photography. Also, experiment with apps (some of my favorites are listed under the equipment heading) and their settings and filters to figure out what you like the best in your images.
3. Composition, or how the viewer’s eye moves around the image, is another topic too broad for this post to really cover well. That said, the viewer’s eye will be attracted to the lightest spot (usually), so pick a focal point that is light, such as the eyes.
- Before you start, think about what emotion you’re trying to show or what the story is you’re telling – your focus, so to speak. Also, take the time to look at your surroundings with your photo in mind. An uncluttered background puts the attention on your subject for a classic portrait. If you are shooting a landscape, have your dog be the focal point for an interesting composition.
- For a basic portrait, focus on the dog’s eyes.
- Shoot with the camera at dog-eye level. This tip is also useful when shooting human subjects. Also, try holding the camera lower than your subject or directly above for a different view – play with the angles!

Lucy poses during a recent walk in the woods. I called her name to get her attention as I hit the shutter. She was above me on a rock ledge so I could stand when I shot the image. This was shot with my iPhone.
- Hold a treat behind or above the lens so the dogs look directly into the camera. Or make a noise to attract their attention to you, behind the camera, for a view of the subject’s face. Profile or 3/4 views also make lovely portraits, so please don’t think there is only one right way. Photos of paws, or a nose, or even a tongue tell a story about personality.
- Pay attention to shadows and reflections – they can really enhance your composition or detract by fighting for attention with your subject.
4. Equipment: Smartphones work just fine! Use what you have, and learn how to use it. If you’re like me, the camera always in your pocket is your smartphone. The newer smartphones have good cameras, so invest a little time in learning how to use the camera and take advantage of the extra features available with apps. While my Canon 7D DSLR takes awesome photos, it’s not always convenient to carry. I tend to leave it at home when I go out on a hike and use my iPhone.
Remember, with a smartphone’s camera on (or open), tap on the area you want to be in focus. The smartphone camera will want to focus on the closest object, which on a dog’s face is the nose, so tapping on the eyes on the screen will tell the camera otherwise.
With a few apps, shutter speed and aperture can be set to better control a smartphone’s camera. These two sets of photography numbers do two different things.

Lucy is frozen in mid-air by setting my iPhone’s shutter speed to 1/1000 using the CameraPlus Pro app. The morning was dark, so the image is dark, even after editing.
- Shutter speed: the larger the number, the crisper – or more frozen – the action will be. 1/1000 freezes Lucy’s hair mid-leap. A setting this high works best in bright light.
- Aperture: Or the f-stop number; the smaller the number (portraits), the more blurry the background will be. The larger the number, the more will be in focus (landscapes). Start with setting either the shutter speed or the aperture leaving whichever you don’t choose on “auto” until you become more comfortable with the settings.
- Steady the camera. Make yourself into a tripod: Decrease camera-shake by holding or leaning on something as you hit the shutter or putting your camera on something. Make sure your setting for stabilization is “on.” Exhale as you hit the shutter.
Some of my favorite apps for my iPhone include Camera Pro Plus (costs a few dollars, but it’s great for setting shutter speed and easy editing), Slow Shutter (for low light and long exposures), and PicsArt (great for adding text or fun filters). I also use Photoshop.
5. Editing apps can really make a difference between a good image and a great one, and apps only take a few seconds to use. While editing tools cannot un-blur a blurry image, they can improve lighting, lighten up shadows, boost color, remove unwanted objects or even the entire background, and crop to improve the composition. Filters on apps can change the mood with a single tap.
Different apps offer different filters and some of my favorites are on the Photoshop Express app. PicsArt has filters that “convert” your photo into a “painting.” The Camera Plus Pro app has a wonderful Clarity Pro feature, under “The Lab” tab, which allows one to adjust the amount of intensity and vibrancy not offered on the free version. The free clarity feature gives results that are a bit overdone for my taste, but try it to see for yourself before you spend money on the Pro version. (I don’t receive any compensation from these app mentions.)
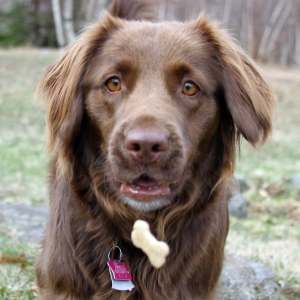
Charlie Brown focuses on the treat. I’ve focused the camera on his eyes to better show his expression. This was shot with my Canon 7D.
6. Have fun! The most important thing is to have fun with your dog. During training time, have your camera handy but keep the sessions short. If you want a big family portrait, practice often with your dog before you gather the people. Take a walk, and take some photos along the way. Your dog will love the walk – and the extra attention – and you’ll be taking wonderful photos to show off your beloved pooch!

Reblogged this on ram0ram note book.
LikeLike
Thank you for sharing my blog and post!
LikeLike
thanks for nice and informative post . love all.
LikeLike
Thank you! I’m glad you enjoyed the post.
LikeLike
Outstanding! Buried in your blog are some great fine art tips. Thanks. Btw may I use some of your photos for background material? Luv ya, Dad
LikeLike
Thank you! And, yes, I’ve had a lot of art classes…
LikeLike
Loved the foggy, misty photo of Charlie. Nice article, I think many of your WagMor friends will love this article and the beautiful photos! Love, Mom
LikeLike